

You can make this with a breadmaker or by hand - I have done both. As usual, the breadmaker is by far the less labour intensive, but don’t let that put you off! It’s my go-to gluten-free loaf.
Gluten free white bread
Makes 1 medium loaf
310g milk (I use soy)
1 tsp vinegar or lemon juice
6 tbsp oil (I use rapeseed, coconut or olive oil)
2 eggs
450g gluten free white bread flour (Dove's Farm was the best one I used to use in the UK)
1 tsp salt
2 tbsp sugar
2 tsp yeast
Place a large jug or bowl on your kitchen scales and then weigh the milk into it. Then beat in the vinegar/lemon juice, oil and eggs. Pour this into the pan of your breadmaker.
Place the flour, salt and sugar into the pan of your breadmaker. Stir slightly with a spoon. Sprinkle the yeast on top. Start the machine on the gluten-free program if it has one, or on the normal bread programme. Check it after a few minutes and scrape down the sides of the pan if necessary. Then let the machine continue.....and in a few hours your home will smell divine and you will have a loaf of gluten-free bread!
To make by hand, mix 325ml warm milk and the same quantities of vinegar and eggs in a large bowl. Combine the flour, salt, sugar and yeast in a separate bowl, then add it to the wet ingredients and mix to form a sticky dough. Continue mixing while you add the oil. Place the dough in a well oiled 1kg/2lb bread tin, cover and leave to rise for 1 hour. Bake in a 220 C oven for 40-45 minutes.
amazing gluten free pizza dough
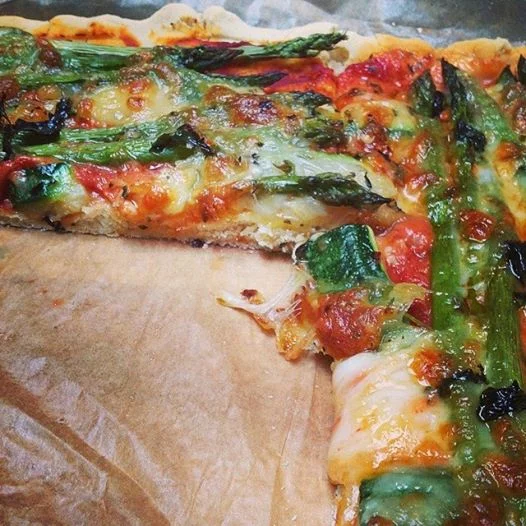
The amazing gluten free pizza! No words.
I used to think that eating gluten free would be a pain in the arse. But then, two years ago, I was asked to do a blogger challenge on my old web site where I would eat completely gluten free for a whole week. It changed my life.
Not only was it way easier than I thought it would be, but I felt incredible. I felt lighter, less clogged, more balanced. As I reintroduced gluten into my diet in the weeks and months that followed, it was all fine, but I was just more conscious of not eating gluten at every single meal (which is very easy to do) and giving my body the occasional break from it.
These days, I like to eat gluten-free when I can at home. Eating out, I'm not fussed (as eating out is a treat anyway) but I've noticed that my body feels better this way. I'm really lucky that it's not medically necessary for me to be gluten free and I feel grateful to be able to eat this way by choice - I've noticed lately when I eat normal pasta I get a tummy ache, so I possibly do have a sensivity, who knows....but either way these days it's all about paying attention, being conscious and giving my body what it's asking for. Which is often something gluten free.
Yesterday, we were craving a pizza and as I had some gluten-free self raising flour in the cupboard, I thought maybe it was worth giving a GF pizza crust a go. I've eaten GF pizzas and used ready-made GF bases (which can be great but are often loaded with sugar so check the label!) before, but I've never made them myself.
But after this, I think I'll be making them this way from now on!
If you have a bread maker, this is a complete doddle - it barely counts as cooking, really. The dough itself rolls out perfectly; doesn't stick to the rolling pin or the board; cooks, slices and eats like a dream. Let me know if you try it!
Gluten-free pizza dough
Based on a similar recipe on Gluten Free Student Cookbook
Makes 1 large pizza or 2 small pizzas
1 egg
1/2 teaspoon rice malt syrup
3 tablespoons olive oil (plus extra for rolling)
130ml filtered water
225g gluten-free flour (plus extra if you need it) (I recommend a GF bread flour or self-raising flour with xanthan gum added to it, I used Dove's Farm white self raising flour)
Pinch of salt (I use Pink Himalayan salt which is fantastic)
1 x 7g sachet dried yeast
If your flour doesn't have xanthan gum added, you'll also need 1 teaspoon xanthan gum.
If you have a breadmaker, add all the wet ingredients to the bread pan first, then add the dry on top. Select the "pizza" setting on the machine (or a "dough only" setting if you don't have a pizza option, it should be about 45 minutes duration) and watch it get to work. Keep an eye on it at first and add more flour if it looks too wet (I found I needed to add about another 1/4 cup flour). Add a little more water if it looks a bit dry. Then sit back and relax until the machine beeps.
If you're doing it by hand, put the dry ingredients in a large bowl first. Make a well in the centre and add the egg, oil and rice malt syrup. Gradually add the water and mix together with a spoon. It will be sticky but this is normal! Add more flour if it's too wet and not coming together. Knead the dough on a floured surface for a few minutes until you have a nice medium-sized ball then leave it to rest in a bowl, covered with a tea towel, for 30 minutes. It won't necessarily "rise" the way normal dough does but don't be put off!
Once your dough is ready, preheat your oven to 200 C.
Line a large baking tray with baking paper. I made one large rectangular pizza rather than circular ones, it was just easier as I didn't know how fragile the dough was going to be. I'd really recommend making it this way.
Drizzle a little olive oil on the top of your dough ball, retrieve from the pan or bowl and roll out on a well oiled or floured board to your required thickness. I ended up doing this on the tray itself and then used my hands to push it into the corners to fit the baking tray and it worked a treat.
Some recipes say you should par-bake a homemade GF pizza crust first but I found this was unnecessary.
Spread your base with your desired toppings (we had tomatoes, asparagus, courgette, mozzarella and fresh basil).
Place in the hot oven for 15-20 minutes. After 15 minutes I found the cheese had browned but the crust still looked a tiny bit pale, so I turned the oven fan off, turned the heat down slightly and put it back in for about 7 minutes. Then it was perfetto.
Let it sit a few minutes to cool then slice with a sharp knife or pizza cutter. Then sit back and watch the compliments roll in!